Choice
| Release: |
• 4.6 • 5.0 • 5.1 • 5.2 • 5.3 • 5.4 • • 6.0 • 6.1 • 6.2 • 6.3 • 6.4 • 6.5 • 6.6 • 7.0 • 7.1 |
|---|
Choice(i, n)
Choice is a user-interface function that displays a drop-down menu in the normal view of the Definition (or in a User input for the variable) to allow an end user to select from a list of options. The index «i» is the list of options -- an index containing the values appearing on the popup. When I: Self, the values listed in the variable's domain are used. «N» is the position of the currently selected option in that list, or 0 for All. This should always be an explicit integer, not an expression.
Choice lets the user to select only one option at a time (or, optionally, All options.) If you want to be able to select any subset of options, use MultiChoice. A Slider is another UI control for selecting a single value at a time.
When the user selects a different option, it changes the value of parameter «n» in the Definition to match that option (or 0 to mean All options.) You can use Choice to show a menu as the definition of a variable or in a cell of an Edit table (or ProbTable or DetermTable). Choice must be the top level of the definition or the cell, and may not be nested within an expression. You must create an Input node for the variable before it will display choices as menus.
The full declaration of Choice() is:
- Choice(I: Index; n: atomic nonNegative; inclAll: optional boolean = True; Eval: optional boolean = True; Result: optional Array[I], separator: optional text)
Optional parameters
InclAll
«inclAll» (default True) specifies whether the "All" option is displayed.
By default, the menu shows All as the first option. If you choose All, the result will be computed for every value of index «i». This makes it easy to do a parametric analysis to see how the choices affect the results. When you choose All, it sets parameter «n» to 0.
If you select All for multiple Choice menus, each variable influenced by the Choice variables is computed for all combinations of values from those menus, adding an index dimension to each result. So if there are more than two or three, the number of dimensions may make the result hard to understand, and long to compute. In rare cases, the model may not be able to compute correctly with All. In such cases, you can turn off All as an option by setting an optional third parameter, «inclAll» to False (0). It usually advisable to set «inclAll» to False whenever you use Choice in an Edit table.
Eval
The «Eval» parameter specifies whether handle or expression terms are evaluated for the return value when index i contains handles to variable or expression. It has no effect when the «Result» parameter is specified, or when «I» contains only constants, such as numbers and text strings. Setting «Eval» to false is recommended in most cases when «I» contains handles (variable identifiers). The «Eval» parameter has no effect when «I» is Self (it is always treated as false).
Result
Normally, Choice(I, n) returns the «n»th value of index «I».. You can use the optional parameter, «Result», to specify a different value to return. The «Result» parameter should be indexed by «I». It will return «Result»[@I = «n»].
This example returns the index position (instead of the label) of the selected value:
Choice(I, 1, Result: @I)
Suppose you have a table A indexed by I, and you want your user to select a row of I, and then select out only the selected row. A standard formulation of this is:
Variable A := Table(I)(...)Decision selectedRow := Choice(I, 1)Variable selectedA := A[I = selectedRow]
You can do this more concisely using the «Result» parameter:
Variable A := Table(I)(...)Decision selectedA := Choice(I, 1, Result: A)
When the «Result» parameter is specified, the «Eval» parameter does nothing.
Separator
You can specify that certain items in I are to display as separators -- nonselectable items used to group selectable items in the menu. Use the «separator» parameter to specify what value in «I» should display as a separator, for example:
Choice(I, 1, separator:'---')
Index Country_S := ['Canada', 'Mexico', 'USA', '---','England', 'France', 'Germany', 'Russia', '---','China', 'India', 'Japan','Philippines', '---','Australia', 'New Zealand', '---','Argentina', 'Brazil', 'Chile']
Variable Select_country := Choice(Country_S, 1, separator:'---')

labels and selectionLabels
'New to Analytica 6.4
These optional parameters enable you to display values in the popup menu or in the control that are different from the index values in «I». Without these, the index values appear. When used, these should be indexed by I. In the case of a Self-choice, you may need to supply a list of values, which has the disadvantage that it cannot adapt to changes in length or re-orderings of the domain value. You can also supply images for either -- if you do so, keep them small. They are not resized from the original size.
«labels» contains the values that appear on the popup menu. When «selectionLabels» isn't also specified, these are also used for the selected value in the control itself.
«selectionLabels» contains the values that appear as the selected value in the control itself.
Example 1: City selection
This example of selecting a city from a hierarchical menu provides an example where it is convenient to have different values for the index value (the result), the «labels» and the «selectionLabels». A given city name often appears in multiple states, for example Salem, Oregon and Salem, New York. To keep index elements unique, the values in the index have the full name in the form "Oregon, Salem", etc.
Index City := ["Alabama, Auburn", "Alabama, Florence", "Alabama, Marion", ...]
Variable State_name := FindInText("^(.+),",City,subpattern:1,return:'S')Variable City_name := FindInText(",\s*(.+)\s*$",City,subpattern:1,return:'S')
State_name and City_name are indexed by City.
Our city selection can now present only the city name on the menus, but the full name in the selection (and result):
Variable Choose_city := Choice( City, 8, inclAll:False, labels:City_name, selectionLabels:City, nestUnder: State_name )- →

Example 2: Color picker
A second example where it is useful for the labels to be different from the index values is a color picker. The Color index can contain the color names or RGB integers, whereas the choice contains color swatches (images).
Index Color := ['red','white','blue','orange','green']Variable Color_swatch := CanvasImage( Canvas( 10, 25, Color ]] )
Variable Choose_color := Choice( Color, 1, labels:Color_swatch)→

The result of Choose_color is "Green".
New to Analytica 6.4
This optional parameter lets you organize the options into hierarchical submenus. The parameter should be a 1-D array indexed by «I». The entries must all be text or Null. Text entries contain the name of the submenu. Multiple levels of submenus are separated by '>'. For example, consider a City index with this «nestUnder» array:
- Variable City_submenus →
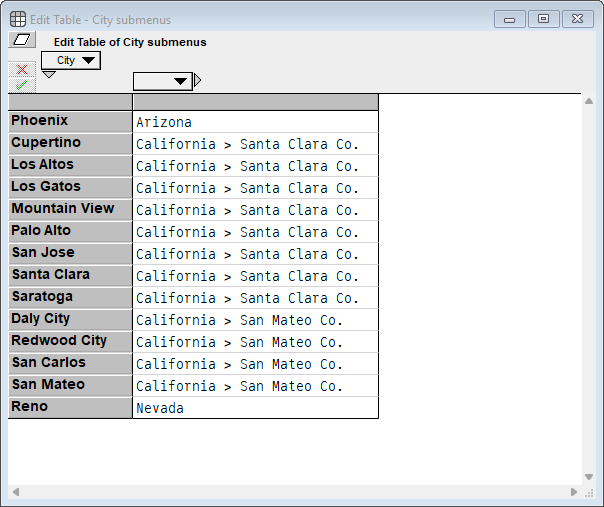
- Variable City_submenus →

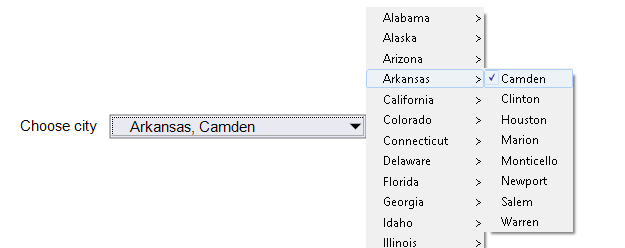
Then Choice( City, 1, nestUnder: City_submenus ) produces this multilevel pulldown:

In this example, Arizona and Nevada are only one level deep, each with a single element, while San Jose is two levels deep, with counties, and cities within each county.
Examples
Suppose multiple variables use Choice(I, n) with the same index I, and you choose All for each of them, e.g.
Index I := ['Low', 'Mid', 'High']Variable A := Choice(I, 0)Variable B := Choice(I, 0)Variable Result := IF A = 'Low' AND B = 'Low' THEN 0 ELSE 100 →Array(I, [0, 100, 100])
Result is indexed by I only once, and A and B are treated as if they have the same values. If you wanted to vary them independently, they should use different indexes, e.g.
Index I := ['Low', 'Mid', 'High']Variable A := Choice(I, 0)Index J := CopyIndex(I)Variable B := Choice(J, 0)Variable Result := IF A = 'Low' AND B = 'Low' THEN 0 ELSE 100 →Array(I, J, [0, 100, 100], [100, 100, 100], [100, 100, 100])
The function CopyIndex(I) makes returns a new index with the same values as I.
Details and more examples
Self-Indexed Choices
When a variable is defined with the first parameter set to Self, as in the definition:
Choice(Self, 0)
then the set of values appearing in the choice are located in the variable's own domain attribute. In this case, the domain must be either a list, list-of-labels or index type.
The easiest way to create a Self-Choice is to select "Choice..." from the definition type popup. Analytica will then fill in a default one-element list-of-labels selection.
When a domain is a list, the elements are usually numbers, but may also be variable identifiers or expressions. (See "Identifier and Expression items" below).
If you use an Index domain, then the values for domain of Self come from another index variable. In this case, Choice(Self,1) when domain = I is very similar to Choice(I,1) with no domain set. There are, however, several differences.
First, if you use an index domain, then your variable will have both an index value and mid/prob values, while if you use Choice(I, 1) your variable will not have an index semantics.
Second, if "All" is selected in the pulldown, the result of <ode>Choice(I, 0) is indexed by I, while Choice(Self, 0) is indexed by Self.
Third, in an index domain using Index I, the values in the domain are the evaluated values of I. If I contains only numbers and text strings, then these are the same as the values of I, but if I contains identifiers or expressions, then there is a difference. Choice(I, 1) would show the identifiers or expressions, while Choice(Self, 1) with domain = I would show the values of those variables in the pulldown.
Input Nodes
Selecting "Make Input" from the Object menu creates a pull-down control that you can position on your diagram as part of a user-interface form.
Pull-downs in edit tables
You can put a Choice pulldown menu in a cell of an edit table. Just type the expression, such as Choice(option, 1, 0). where option is an index containing the possible options. You usually set the third parameter, «inclAll», to 0, so to remove the All option. Otherwise, if the user selects "All" in a table, array abstraction causes the index option to become an index of the entire value of the table result. Similarly, you can specify Choice and Checkbox in the cells of any DetermTable, ProbTable, IntraTable, or SubTable.
When you enter a valid Choice or Checkbox expression into a table cell, the cell immediately shows the menu or checkbox. But, you will also see an expression/choice selector near the right top of the window:

If you select the expr option, you will see all cells as text expressions, so you can review and edit them directly.
In browse mode, these cells with controls always appear as controls. The controls appear as disabled (so you can't change them) in browse mode, unless or until you create an input node for the table.
In Analytica 4.0 thru Analytica 4.4
In these earlier versions, there is now expression/choice select, and you can only see the expression in Edit mode, allowing you to edit the definition.
Using Choice with DetermTable
A useful arrangement is to use Choice variables for key parameters, especially parameters where you may want to perform a parametric analysis (by selecting "All"), and then organizing tabular data in DetermTables (rather than standard Edit Tables). This arrangement looks like the following:
Decision Scenario := Choice(Self, 0)Domain of Scenario : [1, 2, 3, 4]Variable A := DetermTable(Scenario)(...)
In this arrangement, the definition of A appears as an edit table, indexed by all domain values of Scenario. However, when evaluated, only the selected row is returned.
With this arrangement, you can compute downstream results for a single Scenario (or other dimension), or for every scenario when "All" is selected. When available memory limits your ability to perform a full parameter analysis across many dimensions (since the number of combinations increases multiplicatively), this setup makes it easy to limit the parametric analysis to only selected dimensions.
A second variation on this is:
Index AllScenarios := [1, 2, 3, 4]Decision Scenario := Choice(Self, 0)Domain of Scenario : Index AllScenariosVariable A := DetermTable(Scenario)(...)
Identifier and Expression Items
When an option in «I» is a handle to a variable, then the pulldown will display either the title of the object or its identifier, depending on whether "Show By Identifier" is selected. The "Show By Identifier" setting is found on the Object menu and can also be toggled by pressing Ctrl+Y .
When you want to set up an explicit list of identifiers to select between, the best way to do this is to create an index node and turn on its MetaOnly attribute. Then set the definition to be a list and enter the identifiers in each cell. You can also compute a list of identifiers.
When the selected item is a handle to a variable, the result of evaluating the Choice function will be either the handle or the result of evaluating the handle, as follows. If the «eval» parameter is specified and set to false, or if the «I» option is Self, then the result is the handle. If the «eval» parameter is specified and true, and the «I» parameter is an index (i.e., not Self), then the result is the result of evaluating the selected variable. When «eval» is not specified, then a handle is returned if «I» is index node with the MetaOnly attribute set or if «I» species the domain of another variable, or otherwise the result of evaluating the variable is returned.
If you are dealing with Choices involving variable identifiers, using Eval: False is generally preferred. Operations such as comparing the selected value to the original index, or use of a DetermTable based on the choice variable, function more consistently and less ambiguously. As a comparison, if you return values (e.g., Eval: True), and two variables in the choice happen to have the same value, then an ambiguity over which variable was selected exists, but with Eval: False no such ambiguity exists.
Pictures in Choice nodes
You can make Choice nodes with pictures as options by creating an Index with pictures in it and using that as the Index in the Choice function:

Instructions for creating an Index with pictures
- Add each picture into Analytica. For help with this step, see Adding Graphics.
- Get the identifier of each picture. You can find the identifier of a picture by clicking on the picture node and either looking at the identifier in the Attribute panel or by opening object mode. It will generally start with “Pi” and end with numbers, e.g., Pi123456789.
- Create a list of handles called ImageHandles using these picture identifiers. Both MetaOnly index or ListofHandles will work.
Pict of (ImageHandles)will give you an array with the pictures as the values.- Use CopyIndex to turn the array indexed by the ListofHandles into an Index
Example code
The following code is an example of an Index with pictures when you have a list of identifiers PictureIdentifier1, PictureIdentifier2, etc:
CopyIndex(Pict of ListofHandles(PictureIdentifier1, PictureIdentifier2, PictureIdentifier3))
The following code is an example of an Index with all of the pictures in MyModuleWithPics:
CopyIndex(Pict of #FindObjects(class:Picture, within:Handle(MyModuleWithPics))
You can combine picture and text in the same index when they are different slices of the array, e.g., [Picture, Text, Picture, Text], but you cannot combine pictures and text in the same slice of the Index, e.g., [Picture & Text, Picture & Text].
Once you have your list of images, you can use it in a Choice node to get a Choice with images, e.g.:
Choice(IndexwithPictures, 1)
Filtering long Choice lists (ACP)
In ACP, when you select a Choice menu that has more than 10 options, it shows a filter box at the top of the menu. As you type into the box, it shortens the menu showing only options that match what you have typed, like so:

Note that this feature is only available in ACP, not (yet) in Desktop Analytica.
History
Releases prior to Analytica 4.4.2 do not support extremely long option lists on the Choice popup. In those releases, the choice pulldown displays only the first 254 items, plus the selected item. This limitation is fixed in patch release 4.4.2, where no such limitation exists. If you have many options and for some reason cannot upgrade to 4.4.2 or later, consider creating a 2-stage hierarchical menu, where the first pulldown offers subgroups, and the second shows a the items in that subgroup.
Pulldowns in Analytica 4.5 and later are described above.
Analytica 6.4 added an option to add a hierarchical organization to the items by specifying an optional «nestUnder» parameter.
Enable comment auto-refresher