Color palette
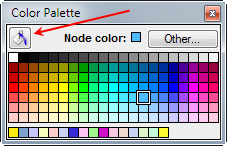
The Color palette
The color palette is used to change the color of nodes or text in an influence diagram.
Displaying the color palette
To display the color palette, select Show Color Palette on the Diagram Menu. The option is available when you have an influence diagram window in focus, and once shown, the Color palette is only visible when you are working with a diagram window.
Once it appears, you can position it anywhere on your monitor, including outside of the boundaries of the main Analytica window, so that it doesn't consume valuable screen space while you are working.
Changing the background color of your diagram
To change the diagram color, first deselect all nodes on the diagram, which you can do by tapping in the background of the diagram. On the color palette, make sure that the fill mode is selected:
Then click on the desired color swatch.
When a diagram's background color has not been explicitly set, it inherits its background color from its parent. Hence, when you change the color of a diagram's background, you also implicitly change the background of all submodule diagrams, except those whose background color has been previously set differently. If you've changed the background of a submodule diagram, and want to unset it so that it will inherit again and update if the parent color changes, set it to the identical color as the parent.
Changing the color of nodes
To change the fill color for one or more nodes, first select them. Make sure the fill mode is selected:
Then click on the desired color swatch and the node colors will change.
In the node style settings for each node is a Fill Color checkbox. If the Fill Color style is unchecked, then no color will display, and you won't see your selected color. Fill Color is on by default for variables, modules and most node types, the exceptions being Text nodes and Picture nodes. Text and Picture nodes are frequently used as backgrounds to visually cluster elements of your influence diagrams, so for them you will need to visit the Node Style dialog from the Diagram menu.
For User Input nodes and User Output nodes, you can change the color of the button or control on the node (except for choice controls, whose color scheme is fixed) in the same manner described here. If you don't set the color of the user input/output node, the color of its variable is used.
Changing the text color of nodes
new to Analytica 5.0
To change the text color on elements on an influence diagram, click on the button at the top-left corner of the Color palette to change to Font color mode:
To set the default text color for the diagram, which will apply to all nodes on the diagram and all future nodes (and all submodule diagrams), deselect all nodes first, then select a color on the color palette. All nodes' font color will change, except those nodes who have had their font color previously changed to a non-default color.
To set the text color of a specific node or nodes, select the nodes before selecting the color on the palette.
If you've previously set the color for a specific node, so that it no longer inherits the default text color from its diagram, and you want to unset that, set the node's font color to the identical color as the default.
Using More Colors
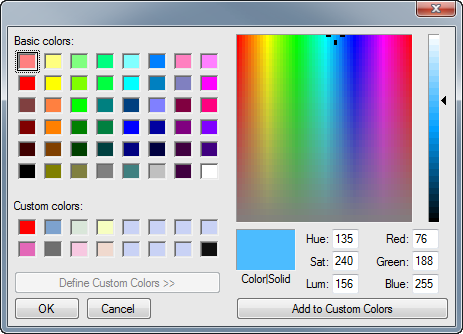
The Other... button gives you access to all possible colors and numeric values for RGB or HSL components.
An interesting, but sometimes confusing, functionality in this window is the ability to define your own set of 16 custom colors, which are even after you exit and restart Analytica, or load other models. These are your own personal palette, and are not stored with the model, but rather remembered as a personal setting on your computer.
To store your own custom color:
- Select one of the 16 Custom Colors swatches first. This is the swatch you will be changing.
- Select or enter the new color for that custom swatch.
- Press the Add to Custom Colors button.
As far as I know, the Define Custom Colors >> button that is visible but disabled is always disabled.
See Also
- Color in influence diagrams from the User Guide
- Changing Series Colors: For changing colors in graphs.
- Cell format dialog: For changing colors in a table
- NodeColor attribute
- NodeFontColor attribute
- DiagramColor attribute


Enable comment auto-refresher