Difference between revisions of "ACP Group Plans"
Davidpaine (talk | contribs) |
m |
||
| Line 128: | Line 128: | ||
[[ File:ACP Users tab 01.png]] | [[ File:ACP Users tab 01.png]] | ||
| − | + | === To add a new user to a project === | |
| − | *Press the '''Add | + | *Press the '''Add Users''' Button at the bottom of the Users list. |
| − | |||
*Enter the email address(es) of the new user(s). | *Enter the email address(es) of the new user(s). | ||
| − | * | + | *Separate email addresses by a comma or space if you add multiple users. |
| − | *Select the User role | + | *Select the User role as Manager, Reviewer or Author. (When adding multiple users, they must all have the same role on the project. To add users with different roles, add users with each role as a separate group.) |
| − | *Optionally, edit the email | + | *Optionally, edit the email you will send to invite the new users. |
| − | |||
*Press the '''Invite and add Users''' button. | *Press the '''Invite and add Users''' button. | ||
After sending the invitation, you will receive a cc of the email to confirm it went out. | After sending the invitation, you will receive a cc of the email to confirm it went out. | ||
| − | If an invited user is not already a user on another project in this Account, their invitation email will contain a randomized password. | + | If an invited user is not already a user on another project in this Account, their invitation email will contain a randomized password. When they first sign in to the group account, ACP will prompt them to change their password. |
| − | : | + | :Each user may have only one ACP password at a time on an ACP server. A user with an existing ACP password, e.g. for an individual ACP account or another Grop account, will be asked to use their existing password. |
| + | |||
===Manage users in a Group account=== | ===Manage users in a Group account=== | ||
Revision as of 17:02, 17 January 2019
<<Back to Analytica Cloud Player
With an ACP Group Account users can share Analytica models with each other and deploy models to end users to run via the web. An administrator can set up multiple projects, invite new users, and set their roles on each project as a Reviewer, Author, or Manager. This page introduces the features of a Group Account.
The Models tab
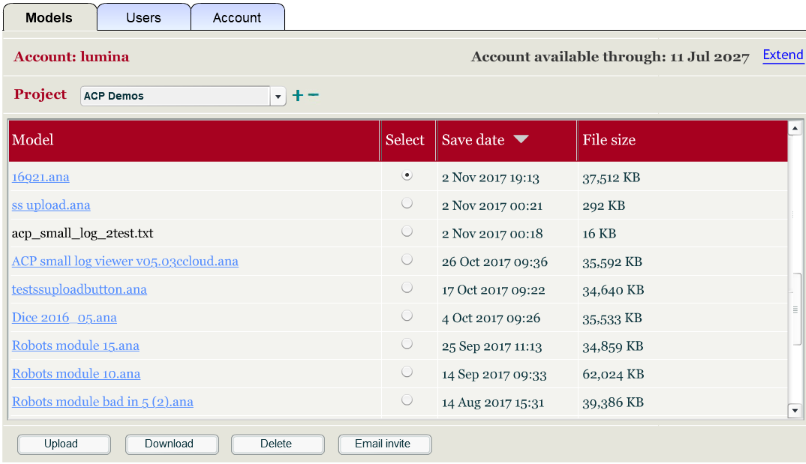
After logging into a Group account, you'll first see the Models tab, which lists the Models (and any data files) for a selected Project:
It has these elements:
- Project menu: Press to see a menu of your projects and select the project you want to view. For non - Admin users, It shows all the projects of which you are a member. When you log in, it shows the project you were in when you last logged out.
- Admin users can see all projects, even those for which they are not explicitly a member.
- For Admin users, the project list puts those projects for which the user is an explicit member first, and then the rest for which they can access (because they are an Admin) but which they are not an explicit member of.
- Models: The list of models, spreadsheets, or other data files in this project. Initially, they are sorted by Save date, most recent first. Click on the header "Model" to sort them alphabetically. Click again on Model name or Save date to reverse the sort order by name or Save date.
- Expiration date: Shows the expiration date for the ACP Account. Click Extend to renew your subscription.
User Types
There are four types of user in an ACP Group account. This table shows their levels of access:
| Privileges | Admin | Manager | Author | Reviewer |
|---|---|---|---|---|
| Run models | ✓ | ✓ | ✓ | ✓ |
| Save snapshots | ✓ | ✓ | ✓ | ✓ |
| Upload & download spreadsheets | ✓ | ✓ | ✓ | ✓ |
| Upload & download models | ✓ | ✓ | ✓ | |
| Delete models | ✓ | ✓ | ✓ | |
| Send email invites | ✓ | ✓ | ✓ | |
| Add users and assign users to projects | ✓ | ✓ | ||
| View subscription info | ✓ | ✓ | ||
| Add Projects | ✓ | |||
| Delete Projects | ✓ | |||
| Delete Users | ✓ |
You can see a version of this table in the Users tab of the ACP front-end by moving your cursor over the (?).
- A user may have access to one or several projects, and may have different levels of access in each project.
- A user has the same password for all projects.
- A Manager for a project may add new users, including other Managers, and change access levels.
Admin users
- Admin users have access to all projects, even those for which they are not explicitly assigned membership.
- Admin users can set up new Projects and add Managers for those Projects. They can also delete users.
- Lumina will set up one or more people as Admin users as requested by purchaser when creating a Group account (or ACP server installation). Contact Lumina if you want to add or change Admin users.
Users Tab
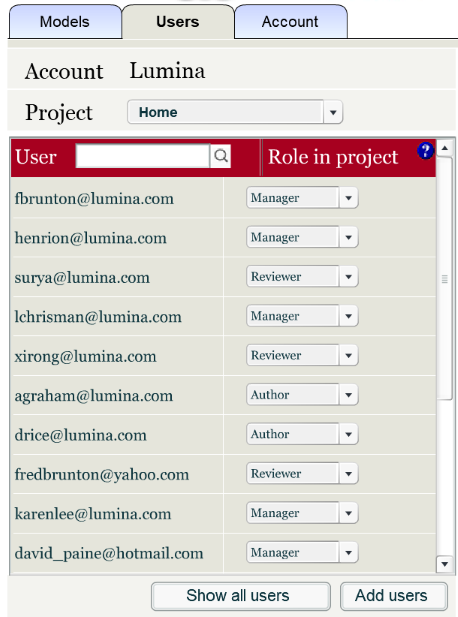
If you are an Admin or a Manager, you will see the Users tab. Click on it to view or manage users in the project. You won't see this tab if your role is Author or Reviewer in all Projects:
- For admin users only, there is a button with the option to display all users or only the users who are members of the project.
To add a new user to a project
- Press the Add Users Button at the bottom of the Users list.
- Enter the email address(es) of the new user(s).
- Separate email addresses by a comma or space if you add multiple users.
- Select the User role as Manager, Reviewer or Author. (When adding multiple users, they must all have the same role on the project. To add users with different roles, add users with each role as a separate group.)
- Optionally, edit the email you will send to invite the new users.
- Press the Invite and add Users button.
After sending the invitation, you will receive a cc of the email to confirm it went out.
If an invited user is not already a user on another project in this Account, their invitation email will contain a randomized password. When they first sign in to the group account, ACP will prompt them to change their password.
- Each user may have only one ACP password at a time on an ACP server. A user with an existing ACP password, e.g. for an individual ACP account or another Grop account, will be asked to use their existing password.
Manage users in a Group account
- Initially only the users who are a member of the selected project will be listed.
- For Admins, to see all users including those who are not members of this project, press the "Show all Users" button. Once this button is pressed the button text changes to "Only show members".
- The 'Role in project' pulldown menu shows the user roles for a particular project, [Not a member, Manager, Author, Reviewer, Delete user].
- If the user signed in is an Account Admin, then [Delete User] will delete the user from all projects. Managers who are not also an admin can't use this feature and will receive a message that permission is denied. (Unless a different user is requested by the purchaser, the Account Admin is the user who signed up for the account i.e the first user in the list.)
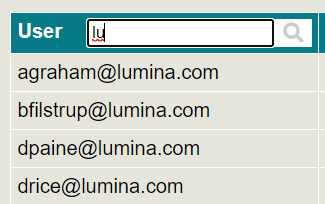
- For Admins, the Users tab shows a search box, and as you type the user list will adjust to show only members that match the text you’ve typed so far, either in the email name, or name of organization (e.g. Lumina.com).
Group Account - Add and delete Projects
- Account Admins can add or delete projects.
Note: The 'Home' project can't be deleted.
- If you are an Admin, next to the Project pulldown menu there are '+/-' buttons. Select '+' to add a project, then enter the project name into the field provided. Select ' - ' to permanently delete a project.
- If you attempt to add a project with the same name as an existing project, you will be prompted to enter a new project name.
Add a custom logo
With an ACP Group account or your own ACP server, you can change the logo at the top left of an ACP model.
- Prepare an image file to use as the logo for your model. You can use png or jpg.
- Open the model in the ACP Group account.
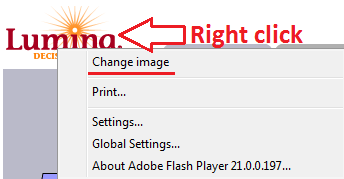
- Right-click the Lumina logo at the top left.
- Select Change image from the right - click menu.
(Opens a window prompting you to open an image file.)
- Then navigate to the image you want to use as the logo for this model and open it,
That's it - the image you selected will replace the Lumina logo in this model.


Enable comment auto-refresher